Monday, March 11, 2019

18 Things You Can Do Now That Your 18

18 Things You Can Do Now That Your 18

Vote


Buy Tobacco, We'll go with Candy


Change Your Name


Adopt a Kid


Get a Tattoo


Jury Duty


Go To Jail


Go Bungee Jumping


Play the Lottery


Buy a House


Get a Loan


Sue Someone


Go Skydiving


Join the Military


Work Full Time


Buy Fireworks


Get Married


Get a Credit Card


Tuesday, February 12, 2019

Sugar Cookies - Best Ever & Easy

Best Sugar Cookies Ever!

I follow a blogger named Rachel Parcel.  She has a blog called pinkpeonies.com.  I have seen her post over the years about her family sugar cookie recipe. They always look so delicious, but I have a family recipe myself, and they happen to be my favorite thing in the world so I never even considered trying her recipe, until today.  Now I have a new favorite recipe.  Thank you Rachel Parcel.

I did make a few changes just to speed up the whole process.  The recipe is very similar, but I created a way to make the Valentines Day cookies without using a rolling pin. 

My two year old granddaughter and I decided we needed a no fail, faster way to make soft delicious sugar cookies. Her attention span does not make it easy to roll out and cut out.  I have to admit, even without a two year old helping, I have always wanted to find a faster way to make my favorite cookies.  This is going to be my go to method from now on.  If I don't want them to be heart shaped it will even be faster.

I used a cookie scoop, instead of a rolling pin. My two year old granddaughter, Lucy, pushed the cookies down with a glass, and then I formed them with the back of a butter knife to look like a rough heart cookie. Then Lucy pushed them down one more time. They were ready to bake so fast and easy. They looked pretty rough around the edges but after they were baked they looked as good as those done with cookie cutters.

Make sure you do not over-cook the cookies. When they come out of the oven slide the parchment paper with cookies off the cookie sheet and onto a cooling rack immediately. They will continue to cook and harden if you don’t get them off the cookie sheet. Using parchment paper allows you to take them off without waiting until they are cool.

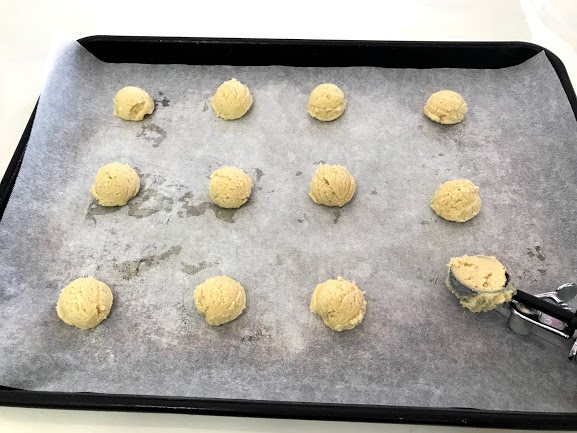
Use a cookie scoop instead of rolling out and cutting out


Keep the dough cold to make this part go faster


Here is the fancy tools used to flatten out the cookies so I don't have to use a rolling pin. This is way faster.


I sprayed the bottom with spray grease and then dipped it in sugar to keep the cookie from sticking.  Lucy flattened the cookies for me.

I used the back of the knife to form a quick heart shape. 

 It doesn't have to be perfect.

The cookies look rough when they go in the oven, but don't worry...


They come out looking great after they have raised and expanded.


We kept some of them circular.


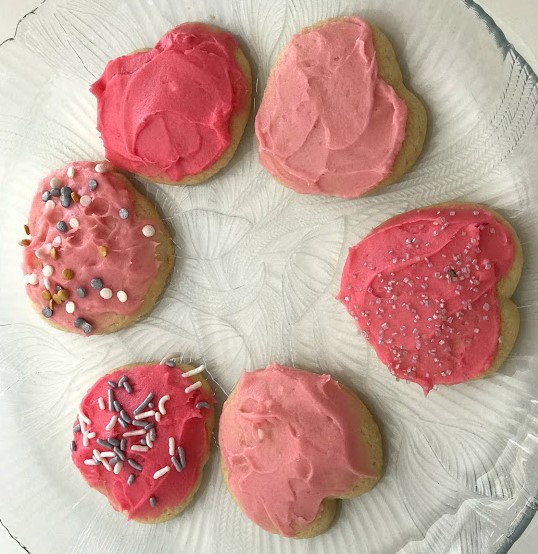
Add some frosting and sprinkles if you like.


They are so delicious and easy!


Download and Print or save to device


Tuesday, December 18, 2018

DIY Kitchen Remodel

Everything looks better with a fresh coat of paint

Can you guess how many of the upgrades are done with paint?

When we bought our house, I knew it was going to need a lot of updating. The kitchen was the highest priority for DIY projects I planned to do. I am just an average stay at home mom with no construction background.  I decided I would see what all I could knock out on my own just by watching youtube videos to learn how to do things.  I also, wanted everything to be able to be done on a very tight budget.  Let me give a list of the things I planned on changing from this picture:

1. Cabinet color
2. Formica countertops
3. Drop down fluorescent light ceiling
4. White plastic sink
5. Dated faucet
6. White appliances
7. Color of the kitchen walls and ceiling
8. No backsplash
9. Baseboard size and color, no chair rail
10. Hardware on the cupboards
11. Dining room table also needed an upgrade
12. Replace arched cabinet doors 
13. Replace hinges with hidden hinges

When I watch home makeover shows on tv, the remodel jobs always happen so fast.  In reality, when you are doing them all yourself, and you don't know how to do anything but paint, there is a large learning curve.  I took lots of photos and videos all along the way.  My initial plan was to have a blog post of hits and misses each time something went well or really flopped.  I wanted to document which youtube videos really worked and which ones should be left to the professionals.  It turned out that doing my own projects and documenting all the steps became very time consuming and I neglected to post as I went along.  

I may still post each step at a future date, but for now, here are the finished kitchen projects.  Well, sort of finished.  I am always changing my mind and redoing things here and there.  Let me give an example;  I hate the arches on the cabinet doors.  I have replaced about half of them, but the others are still being built, by me.  The new cabinet doors also have hidden hinges.  These are things you wouldn't necessarily notice but they certainly look better when they are all done.  At this pace it will probably be 6 months before they are all done.  I will do one every time another project I am working on needs time to dry or I am waiting on supplies etc.  If you look closely in the pictures some of the upper cabinets are still arched.


List redone, cabinet color, formica countertops, drop down fluorescent light ceiling, white plastic sink, dated faucet, white appliances, color of the kitchen walls and ceiling, backsplash, baseboards size and color, hardware on the cupboards, replace arched upper cabinet doors, hidden hinges

One of my favorite projects was the counter and backsplash.  These are just painted to look like marble, then coated with Stone Coat Countertop Epoxy.  I did my dining room table as a trial run before taking on all the countertops.  I love them so much.  It was hard to photograph because they are so shiny.  It's like taking a picture of a mirror, but they make me so happy!

I know having a cabinet desk combination is very dated, but we use this space a lot, so I decided to just give everything an update instead.  I see in this picture the ugly linoleum in the laundry room off to the side on the left.  I painted that to look like tile.  It's not shown in the picture, but it no longer looks like this. I'm reminded of another blog post I still need to do. Painting linoleum is a great way to update without a lot of commitment or expense. 

I can't believe how different it looks with recessed lighting

I ordered special lights to go in the Pendants.  They have silver tips on them.  Regular lights were a little to bright and I wanted a little more pizazz. 


I love the backsplash on this and the marble countertop.
Well it looks like marble. It's just paint and epoxy.
I also added chair rail and painted all the walls grey.

Taking down the light structure and installing recessed  and pendant lighting turned out to be the hardest project I have ever done DIY.  I had to get my kids and husband to help with the heavy lifting.  If I had it to do over again I would probably hire that part done.  Drilling holes in the ceiling and in the joists so I could run wire was a huge challenge.  But, now I know how to do it.  Thank you youtube, and my brother Daniel who facetimed me to make sure I didn't electrocute myself. 


Stay tuned for my next project.


Monday, November 26, 2018

Refinished Table 4 Years Later - Update

The Epoxy Table Top is Still Holding Up


Before I updated the table it was very dated
The top was formica

https://youtu.be/AD_IYbAeXck

The original post with all the instructions on the DIY is in the link below:

https://fiveorlesssteps.blogspot.com/2015/01/epic-fail-every-once-in-while-diy.html

Family Traditions Bind Us Together!

DIY Christmas Stockings


Everyone in the family designs their own stocking


Trees, Snowflakes and Candy Canes are always Beautiful


Sometimes couples coordinate their stockings


Nathan is on a mission so he gets a mission tie.
Grant made a torn stocking look. Anything goes!

I buy the stockings on clearance at the end of the year,
but even full price, they are a great no-sew option


Glitter and glue are the only items we used the first few years.  This year I splurged at the dollar store and got some tiny mirrors and a beaded tie.  Still the entire project was under $20.


Family Traditions Bind Us Together

Stability, purpose and security seem to come in abundance whenever we engage in a family tradition. During the holidays we have a lot of them. Some involve food, games, songs, and telling stories, but one of our favorite traditions is decorating Christmas stockings. Everyone in the family gets together one night a year, and creates our own masterpieces. All you need are some plain stockings, glitter and glue.  We put a piece of plastic down on the table to catch all the glitter as well as using plates and paper, but lets face it, glitter does get everywhere.  My boys call glitter Satan's dust.  They hate it, but only in a joking way.  Let's face it, glitter helps keep us all in the spirit of having fun together and creating memories.  There is nothing like telling a 25 year old son he has glitter on his cheek.  That's a good time!

My sons call glitter Satan's dust, but let's face it,
We all love the look it makes on our Christmas stockings

One of the great things about traditions is that they can live on for generations. It’s never too late to start a new tradition. Creating your own Christmas stockings year after year is something our family looks forward to and talks about for months leading up to our big day.
 
In order for this tradition to be something that can be done in one evening and by all ages and artistic abilities we have decided to keep it simple. I purchase a couple dozen Christmas stockings each year when they go on clearance but even when they are full price they cost under a dollar apiece. Buy some glue and glitter and you are ready to go. Make sure you buy extra stockings because every once in a while the design will go completely wrong and in order to keep the peace in the household it needs to be thrown out and started over.

Our family sits around the kitchen table, with Christmas music in the background and we create our works of art. This year I splurged on a few extra gems and mini mirrors. I got the stickered mirrors and some of the glitter from the dollar store.

This is a tradition I highly recommend!