Showing posts with label Bling Projects. Show all posts

Monday, August 28, 2023

How to Make a Glittery Cinderella Coach Using Dollar Tree Supplies

Do you love Cinderella? Do you want to create a beautiful and glittery carriage for your little princess? If so, then you'll want to watch this YouTube tutorial! In this video, I will show you step-by-step how to make a Cinderella coach using supplies from Dollar Tree.

There are many benefits to watching a YouTube tutorial on how to make a glittery Cinderella coach using Dollar Tree supplies. Here are a few:

  • It's easy to follow. The video is very well-paced and easy to follow, even if you're not crafty.
  • It's affordable. The supplies you need can all be found at Dollar Tree, so you won't have to spend a lot of money on this project.
  • It's fun for the whole family. This is a great project to do with your children. They'll love helping you make the carriage and they'll be proud to display their finished product.
  • It's a great way to add some magic to your home. This carriage is sure to make your child's room feel like a fairytale.
  • It's a great way to celebrate your love of Cinderella. If you're a fan of Cinderella, this is a great way to show your love for the character.

Watching a YouTube tutorial on how to make a glittery Cinderella coach using Dollar Tree supplies is a great way to learn how to make this beautiful craft. It's also a great way to spend time with your family and create something special. So what are you waiting for? Start watching today!


Wednesday, February 16, 2022

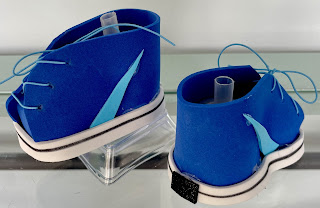
Easy No Sew Gnome Shoe Tutorial 2022 - Free Shoe Template


I made this one during a YouTube Live


I made this one with a YouTube Tutorial


Feel free to download this template to create your own fabulous Gnome Shoes.


Free To Download


Wednesday, February 24, 2021

DIY Poms and Banner Penndant


DIY Banner With Pom-Poms


Tutorial showing how to make a Saint Patrick's Day Pennant Banner with pompom. This video shows how to make pompoms in an easy quick way using cardboard. Sizes can be changed easily just by changing the cardboard size.

Thursday, November 5, 2020

Magnetic Makeup Station Dollar Tree DIY


Magnetic Makeup Station


I love creating and making my own gifts, but this one came out of a dire need.  One day I looked at my bathroom counter, with all my makeup strung about and thought to myself, there has to be a better way. When I put my makeup in a container of some kind, it is time consuming, jumbled up and not very effective.  In the morning when I am getting ready I find myself searching to  find the perfect brush, or the exact eyeshadow I was looking for. I realized I would prefer to have an entire makeup station where each item had a home. The problem with this logic, is that means my bathroom counter looks like a bomb went off all the time. I finally realized it was time to create a solution to my dilemma. That is when the magnetic makeup station idea came to my mind.  I have used the Dollar Tree makeup stands in the past, but they come in little sections so every time I wanted to clear the counter and move them, it is big chore. Also, they tend to get top heavy and tip over and with the brushes standing up, they don't really fit in a drawer. That is when I figured out the best solution would be to create a magnetic makeup station that can be easily moved to a shelf on the wall when not in use. If I blinged out the station enough, it would then look like a decoration rather than a huge mess. So out of necessity, I created the Magnetic Makeup Station. It turned out so beautiful, I decided to make a few extras and give them away as Christmas gifts.


Dollar Tree DIY

Paint Cookie Sheet Black


Glue and Glitter Glam it Up


It's an easy 5 minute craft


Lots of glue and glitter on the bottom

Glue and Glitter on the Sides is also Fun


Beautiful


Portable Makeup Station
Can easily be moved to a shelf


Wednesday, July 15, 2020

Lamp Shade DIY

Lamp Shade Glam

Creating fun glam lamp shades made from Dollar Tree items is one of my favorite projects to date. The look is something I’m obsessed over. Watch my YouTube video with all the instructions and details.


Follow me in Instagram at diyismyhappyplace.

Thursday, January 30, 2020

Valentine's Day Craft


This is an easy 5 minute craft that also is easy on the budget.  I love to spruce the house up for Valentine's day with a little bling. Putting 4 picture frames together makes a nice decoration. The Dollar Tree wooden heart is an easy 5 minute craft subject.

Dollar Tree DIY Craft


I love to do crafts on a tight budget and it turns out, this one might be my favorite one yet. I used glue and spray paint that I already had so the total cost for this project was $12 for two sconces.  Now that's a bargain!

I saw this craft on Beverly's Stunning Creations who had a post on Instagram.  I watched her how to video and couldn't get it out of my mind.  I knew I had to give it a try.  I went to the Dollar Tree store to pick up the necessary supplies.  My particular store did not have the right size metal wreath that she used in her video so I improvised and created my own version of the same wall decoration.

I really loved how it turned out.

Friday, August 23, 2019

Headboard Made From Pallets

Pallet Headboard

Years ago I made my headboard out of pallets.  At first I just put them behind my bed leaned up against the wall.  They were extra long and sturdy.  This was the rustic bedroom look.  


Did you know you can get pallets for free?

I love free so much.  

I didn't take a picture of the original headboard but you
can see the remnants of it at the bottom of the current one.
After a while I wanted a change so I added some fun Chevron wrapping paper with Mod Podge.  Those were my "Chevron" days.  Skip ahead a few years and I decided I wanted the pallets covered in fabric.  

Many times when I start a Do It Yourself project the number one goal is to make something out of what I already have around my house.  I knew I wanted to have fabric and buttons.  I had some curtains that were in a bag destined for goodwill that I reclaimed.  This was my tan room phase.  Fabric covered buttons cost a pretty penny and it would be very hard to match with the curtains, so I made my own simply adding fabric to reclaimed buttons with glue.  I watched some DIY videos online of the correct way to upholster furniture to look like this, but it was a lot of steps and seemed like it was too much work.  

I knew my headboard's backside would never be seen so I just added some cotton meant for making quilts, laid the fabric across it and stapled it in the back.  Easy 5 minute solution.

I then measured off the areas I wanted buttons to indent into the headboard.  I stapled those areas down with the same heavy duty stapler.  It took longer to find the spots I wanted than the actual stapling.  

After the indention's have been established, make my buttons. Glue fabric with a tiny bit of cotton batting to the buttons gathering in the back.  Then glued them to the headboard.  Hot glue works great.  No sewing was needed for this entire project.  Just a heavy duty stapler and some glue.  The buttons were even salvaged from goodwill items so I didn't have to buy new buttons. 

(Tip, going to goodwill and looking at clothes just for their buttons is a lot cheaper than buying buttons at a fabric store).

I kept my headboard like this for a couple years, but then grew sick of the color.  I tried spray painting it white, but the fabric just sucked in the paint and really didn't give it the look I desired, so don't  make that mistake.  On my second try I used semi-gloss white paint.  This worked magnificently.  It was easy to apply and the coverage was instantaneous.

It did take two coats, but after it dries the results are fabulous.  I used a roller brush to paint with for everything  except around the buttons.  In order to get into the grooves, I needed to use a regular paint brush.


 Adding bling to the buttons is easy and just to give it one last bit of sparkle string lights across the top and sides.  Make sure they are LED lights that do not heat up!

Follow me on Instagram at


diyismyhappyplace 


Pallet Headboard Makeover


Monday, November 26, 2018

Family Traditions Bind Us Together!

DIY Christmas Stockings


Everyone in the family designs their own stocking


Trees, Snowflakes and Candy Canes are always Beautiful


Sometimes couples coordinate their stockings


Nathan is on a mission so he gets a mission tie.
Grant made a torn stocking look. Anything goes!

I buy the stockings on clearance at the end of the year,
but even full price, they are a great no-sew option


Glitter and glue are the only items we used the first few years.  This year I splurged at the dollar store and got some tiny mirrors and a beaded tie.  Still the entire project was under $20.


Family Traditions Bind Us Together

Stability, purpose and security seem to come in abundance whenever we engage in a family tradition. During the holidays we have a lot of them. Some involve food, games, songs, and telling stories, but one of our favorite traditions is decorating Christmas stockings. Everyone in the family gets together one night a year, and creates our own masterpieces. All you need are some plain stockings, glitter and glue.  We put a piece of plastic down on the table to catch all the glitter as well as using plates and paper, but lets face it, glitter does get everywhere.  My boys call glitter Satan's dust.  They hate it, but only in a joking way.  Let's face it, glitter helps keep us all in the spirit of having fun together and creating memories.  There is nothing like telling a 25 year old son he has glitter on his cheek.  That's a good time!

My sons call glitter Satan's dust, but let's face it,
We all love the look it makes on our Christmas stockings

One of the great things about traditions is that they can live on for generations. It’s never too late to start a new tradition. Creating your own Christmas stockings year after year is something our family looks forward to and talks about for months leading up to our big day.
 
In order for this tradition to be something that can be done in one evening and by all ages and artistic abilities we have decided to keep it simple. I purchase a couple dozen Christmas stockings each year when they go on clearance but even when they are full price they cost under a dollar apiece. Buy some glue and glitter and you are ready to go. Make sure you buy extra stockings because every once in a while the design will go completely wrong and in order to keep the peace in the household it needs to be thrown out and started over.

Our family sits around the kitchen table, with Christmas music in the background and we create our works of art. This year I splurged on a few extra gems and mini mirrors. I got the stickered mirrors and some of the glitter from the dollar store.

This is a tradition I highly recommend!

Wednesday, January 24, 2018

Pinterest Hit! DIY Bling Shoes


DIY Bling Shoes

I bought the crystals at Hobby Lobby on a half off sale.  $7.00


E-6000 Clear Glue

The best Purchase of all was the Jewel Picker.

It has a wax top that allows you to picks the jewels up and places them on the glue with ease.  I smudged some glue on the heel of the shoe.

Only due a small area at a time.  Enough to place about 10 jewels at a time.


I was able to put the jewels on the shoes in about 10 minutes.  This is one of the easiest DIY projects I have ever done.


Update 1-24-2018.  I originally jazzed up a pair of shoes back in 2014.  It has now been 4 years and they are still my favorite pair of shoes.  I wear them about 3 times a month and always get a lot of accolades.  They were so easy to make and worth the effort.  This is definitely a pinterest HIT!

Tuesday, December 5, 2017

Pinterest Miss - Phone Case

I love How the Case Turned Out
There Is Only One Problem
And It's a Major One...

Over the years I have tried a lot of DIY projects I found on Pinterest and to date, this is still the one that hurts the most.  I love to bling things up to the nines and this one turned out to be so easy and really a favorite.  It made me happy all the time.  I was so proud of it.  I also blogged about all the benefits of making your own jeweled items including a cell phone case. It was quite the conversation piece. Ladies wanted to know where they could buy them and ultimately how to make them. They are so cheap and easy to make, I understood why so many people were interested in joining the b-dazzle world for themselves. But then, I realized a downside when it came to the amazing world of jewels and cell phones. It's such a large downside that I have given up on the jewels all together when it comes to my phone.  Here is why...

The precious little crystals cause interference with the cell phone signal and ultimately make your phone conversations hard to hear or dropped all together.  So it comes with very large regret on my part that I have to announce this DIY project as a major bust.  Sorry one and all for this horrible announcement.