

Amy's Favorite DIY Projects
Showing posts with label DIY in 5 steps or less.. Show all posts
Showing posts with label DIY in 5 steps or less.. Show all posts
Tuesday, April 30, 2019
Friday, March 29, 2019

Thursday, March 28, 2019
Wednesday, March 20, 2019
Update Staircase - Remove carpet
Best DIY Project Ever!
I love how my stairs turned out.
How to remove carpet from staircase and give them an updated look for under $100. It's so easy even a grandma could do it. I know because I did it, and I'm a grandma.
Tuesday, February 12, 2019
Sugar Cookies - Best Ever & Easy
 |
Best Sugar Cookies Ever! |
I did make a few changes just to speed up the whole process. The recipe is very similar, but I created a way to make the Valentines Day cookies without using a rolling pin.
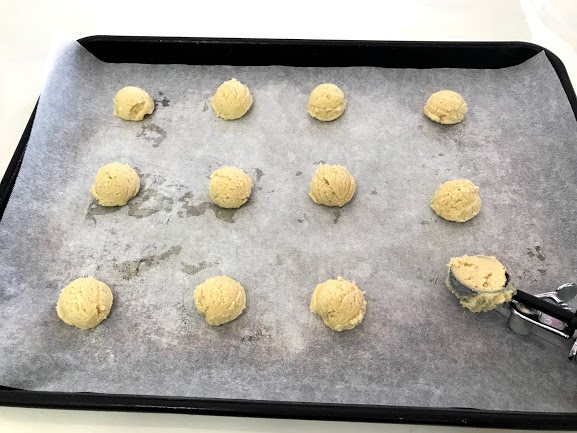
My two year old granddaughter and I decided we needed a no fail, faster way to make soft delicious sugar cookies. Her attention span does not make it easy to roll out and cut out. I have to admit, even without a two year old helping, I have always wanted to find a faster way to make my favorite cookies. This is going to be my go to method from now on. If I don't want them to be heart shaped it will even be faster.
I used a cookie scoop, instead of a rolling pin. My two year old granddaughter, Lucy, pushed the cookies down with a glass, and then I formed them with the back of a butter knife to look like a rough heart cookie. Then Lucy pushed them down one more time. They were ready to bake so fast and easy. They looked pretty rough around the edges but after they were baked they looked as good as those done with cookie cutters.
Make sure you do not over-cook the cookies. When they come out of the oven slide the parchment paper with cookies off the cookie sheet and onto a cooling rack immediately. They will continue to cook and harden if you don’t get them off the cookie sheet. Using parchment paper allows you to take them off without waiting until they are cool.
 |
Use a cookie scoop instead of rolling out and cutting out |
 |
Keep the dough cold to make this part go faster |
 |
Here is the fancy tools used to flatten out the cookies so I don't have to use a rolling pin. This is way faster. |
 |
I sprayed the bottom with spray grease and then dipped it in sugar to keep the cookie from sticking. Lucy flattened the cookies for me. |
 |
I used the back of the knife to form a quick heart shape.It doesn't have to be perfect. |
 |
The cookies look rough when they go in the oven, but don't worry... |
 |
They come out looking great after they have raised and expanded. |
 |
We kept some of them circular. |
 |
Add some frosting and sprinkles if you like. |
 |
They are so delicious and easy! |


 |
| Download and Print or save to device |
Monday, November 26, 2018
Refinished Table 4 Years Later - Update
 |
The Epoxy Table Top is Still Holding Up |
Before I updated the table it was very dated
The top was formica
https://youtu.be/AD_IYbAeXck

https://youtu.be/AD_IYbAeXck
The original post with all the instructions on the DIY is in the link below:
https://fiveorlesssteps.blogspot.com/2015/01/epic-fail-every-once-in-while-diy.htmlFamily Traditions Bind Us Together!
 |
DIY Christmas Stockings |
 |
Everyone in the family designs their own stocking |
 |
Trees, Snowflakes and Candy Canes are always Beautiful |
 |
Sometimes couples coordinate their stockings |
 |
Nathan is on a mission so he gets a mission tie.
|
 |
I buy the stockings on clearance at the end of the year,
|
 |
Glitter and glue are the only items we used the first few years. This year I splurged at the dollar store and got some tiny mirrors and a beaded tie. Still the entire project was under $20. |
Family Traditions Bind Us Together
Stability, purpose and security seem to come in abundance whenever we engage in a family tradition. During the holidays we have a lot of them. Some involve food, games, songs, and telling stories, but one of our favorite traditions is decorating Christmas stockings. Everyone in the family gets together one night a year, and creates our own masterpieces. All you need are some plain stockings, glitter and glue. We put a piece of plastic down on the table to catch all the glitter as well as using plates and paper, but lets face it, glitter does get everywhere. My boys call glitter Satan's dust. They hate it, but only in a joking way. Let's face it, glitter helps keep us all in the spirit of having fun together and creating memories. There is nothing like telling a 25 year old son he has glitter on his cheek. That's a good time! |
My sons call glitter Satan's dust, but let's face it,
|
In order for this tradition to be something that can be done in one evening and by all ages and artistic abilities we have decided to keep it simple. I purchase a couple dozen Christmas stockings each year when they go on clearance but even when they are full price they cost under a dollar apiece. Buy some glue and glitter and you are ready to go. Make sure you buy extra stockings because every once in a while the design will go completely wrong and in order to keep the peace in the household it needs to be thrown out and started over.
Our family sits around the kitchen table, with Christmas music in the background and we create our works of art. This year I splurged on a few extra gems and mini mirrors. I got the stickered mirrors and some of the glitter from the dollar store.
This is a tradition I highly recommend!
Wednesday, January 24, 2018
Pinterest Hit! DIY Bling Shoes
 | ||||||
DIY Bling Shoes
I was able to put the jewels on the shoes in about 10 minutes. This is one of the easiest DIY projects I have ever done.
Update 1-24-2018. I originally jazzed up a pair of shoes back in 2014. It has now been 4 years and they are still my favorite pair of shoes. I wear them about 3 times a month and always get a lot of accolades. They were so easy to make and worth the effort. This is definitely a pinterest HIT!
|


Tuesday, December 5, 2017
Pinterest Miss - Phone Case
 |
I love How the Case Turned Out
|

Wednesday, May 17, 2017
Sofa Makeover Update
 |
Leather Sofa looks like new again! |
I originally posted this DIY project on my blog 2 1/2 years ago. I took an old sofa that was destined for a junk pile and created my favorite DIY project ever.
Here is the link to the instructions of how to transpose a leather sectional to look like new:
http://fiveorlesssteps.blogspot.com/2015/02/how-to-turn-old-coaches-into-something.html
Now 3 years later, my sofa is in need of a 10 minute update to get it back to par.
Now 3 years later, my sofa is in need of a 10 minute update to get it back to par.
 |
As you can see, there is some wear and tear. I am happy to report, the stain never came off on clothing. It does take a few days to completely dry. Just remember, it is cheap, fast, and easy, but you do need a week of drying time. Stain dries slowly when it is applied to leather. After it is completely dried, it does not come off on clothing at all! |
 |
On the left is what it looks like after a little stain is rubbed on. Don't forget to wear gloves. Stain does not come off your skin easily. I did have to buy a new can since my old one was in the garage and dried out. A small can goes a long way. It cost $5.60 at Walmart. |
 |
This time I didn't have to do all over the sofa. I just touched up the areas that had a lot of wear.It took less than 10 minutes. |
 |
I still love it! |
Tuesday, February 3, 2015
Leather Couch Make-Over DIY
 |
Leather Couch Makeover
|
Don't Throw Away Your Old Leather Couch
This DIY makeover will astound you.
UPDATE Dec. 12, 2015
One year later, my sofa is still looking like new. I didn't use any sealant, it hasn't rubbed off, and there hasn't been a downside. This really is the best $10 investment I have ever made!
And It's Easy!
It sounds to good to be true, but it really works.
Once you are finished it is as good as new.
The stain does not rub off at all!

I got
a new couch for Christmas. My sectional had been a good piece of
furniture but over the years it had been through the ringer and it was time for it to be
retired. A couch can only take so much abuse. We picked up
a new sofa and brought it home, thinking we would retire our sectional to the
unfinished basement until we could find a place to throw it out. The only
problem was, we couldn't fit it down the narrow stairs. Now we were left with a
dilemma. We didn't have room for two sets of furniture on the main floor so
the formal living room furniture had to me moved to the basement to make room
for the worn out sectional until I could get it hauled away.
The next morning I was
looking at the sectional and all the trouble it had.
 |
The leather had been worn down so much it was white in places |
 |
When the pieces were not attached it really looked bad.
|
 |
This part has a recliner, but even it was worn and shabby looking. |
 |
There were tears all over the place |
 |
This piece was really torn.
|

One day I decided to try something to make this sectional not look like such an eye sore until I could find a truck to haul it away.
I threw down some cardboard on the floor and got the can of stain I have been staining everything around my house. It was a Kona color which I love. I only had about a quarter of a can left, but I figured I might as well give it a try. If it didn't work it was leftover stain anyway so no loss.
I rubbed the stain on one section of the sofa.
My $8 can of stain had already done so much for me but why not see if I could stretch it a little bit more.
When I came back into the room a few hours later I realized I loved how it looked. I let it dry completely for 3 days then I tested it out. I sat on the couch with a white t-shirt on. Absolutely nothing rubbed off. Not even a little bit.
This is when I figured out I was on to something big!
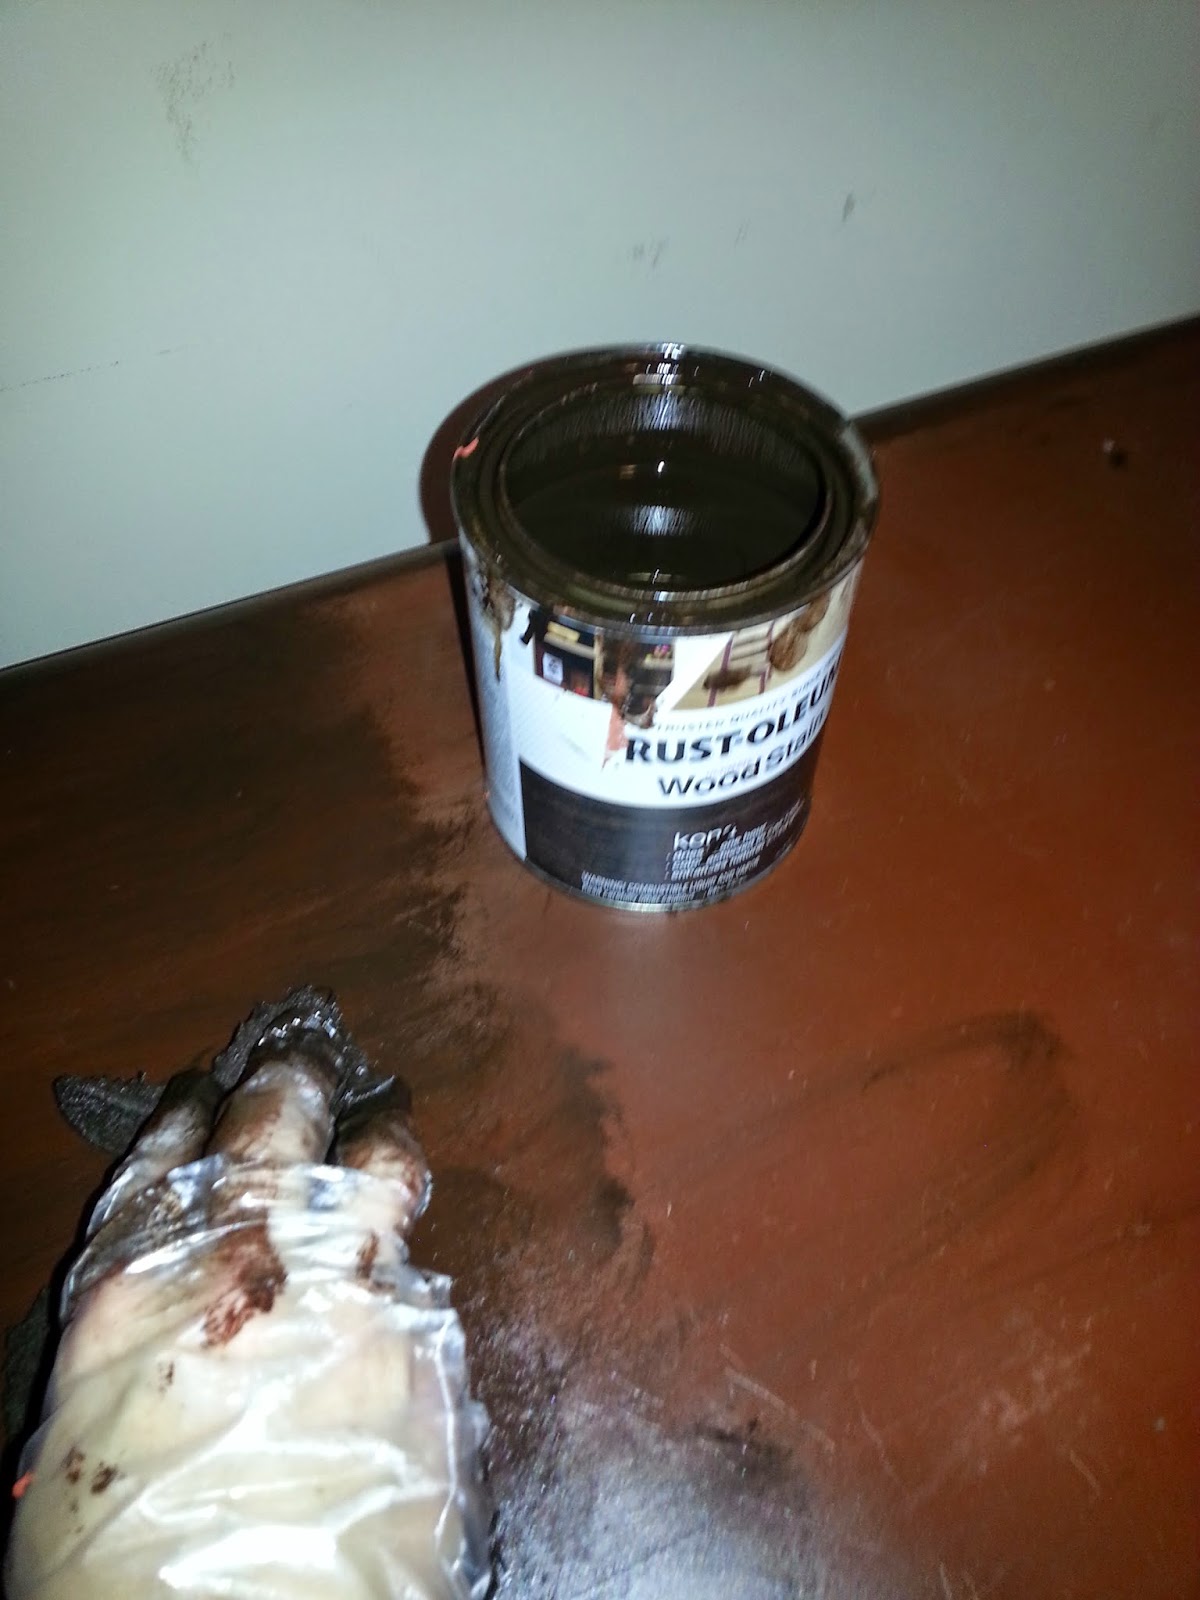 |
Kona Rust-Oleum Wood Stain
|
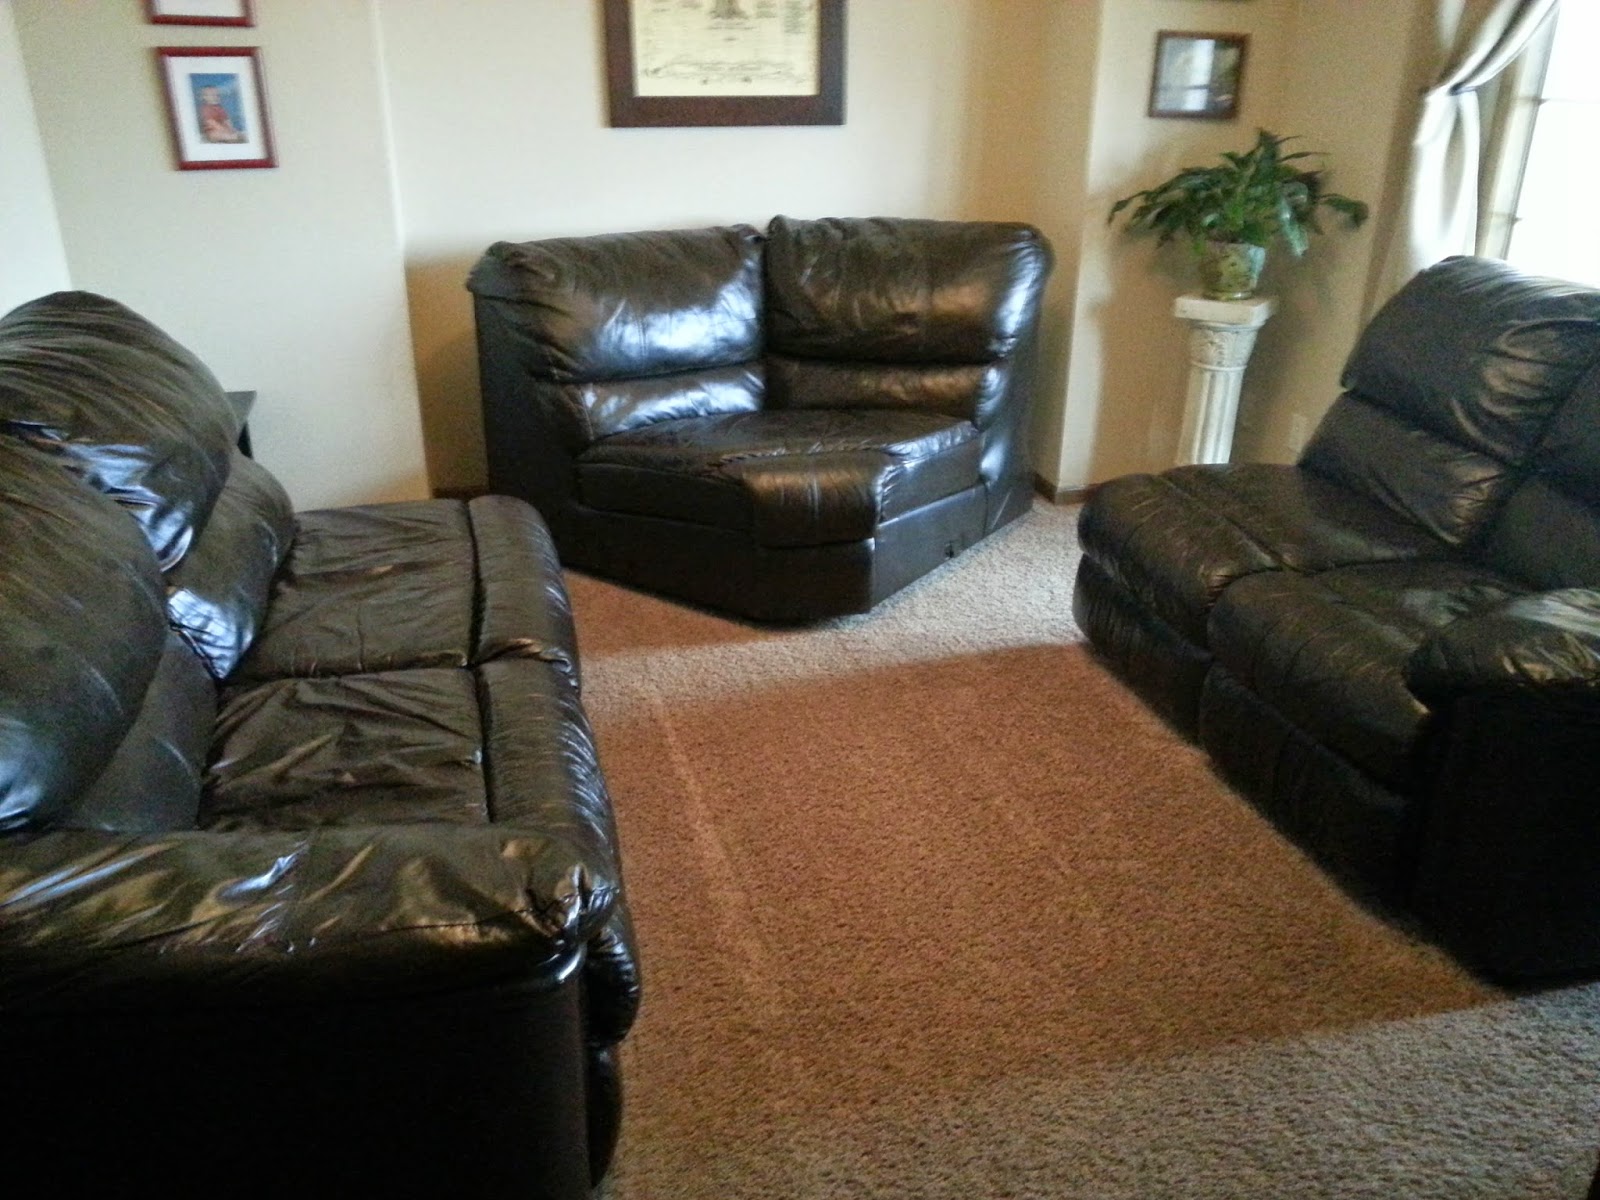 |
I couldn't wait to finish up the entire sectional.
|
 |
I stitched all the stuffing back into the arm and stained right over it. |
 |
I am amazed at how nice it looks.
|
 |
I stained right over all the hardware and handles so everything matches |
 |
I even stained the metal brackets that hold the sectional together when it is in one piece. Now they don't even show up. |
 |
Once the leather dries if feels just like it did before. |
 |
I can see no downside to staining leather |
 |
I did end up needing to buy another can of stain because the leather soaks up the stain more than wood does, but if I had started with a new can from the beginning I could have done the entire sectional and still had some left over.
|
 |
I love the furniture now!
|

Subscribe to:
Posts (Atom)